
Applying a Decorative Concrete Overlay to Your Cement Surfaces is Worth Considering to Beautify Your Home- Here’s Why Part Two
 Mixing a Stampable Overlay
Most mixes are premeasured and prepackaged. Even though this is the case, it is possible to make mistakes which can harm your installation process.
First thing to know is proper liquid volume ratios are important to make sure you obtain the right consistency. If you apply too much liquid, you can create cracking, shrinkage, and a wear surface. If you do not put enough liquid into your mixture, you can risk the integrity of its workability and adhesion. It is also important to mix thoroughly, because if you don’t, you can cause bubbles to form. The size of your installation will determine your mixing method.
On projects up to or less than 2,000 square feet, mixing materials in 5-gallon buckets or 30-gallon barrels that can hold two or three bags along with the mixing components using an industrial-type paddle drill is a good method. It is also advised that you have a backup drill in case one burns out while mixing.
Mortar mixers can hold four or five bags of mix, which can cover three cubic feet to six cubic feet worth of material, which will facilitate mixing larger batches, which may be needed for commercial projects. Dumping the mixture into a wheelbarrow will help you get the product to the work area more efficiently.
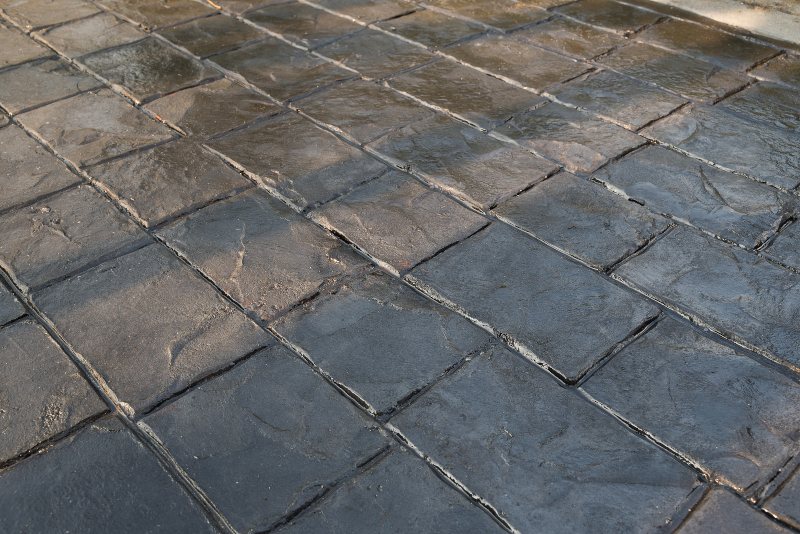
How Thick? Applying the Overlay
Installing stamped overlays depend on more skill than other surface toppings due to their thick consistency and extra steps needed for stamping and finishing. They usually range from ¼ to ¾ of an inch thick, depending on the texture profile or the stamping mat. The most idyllic way to measure the thickness, is to measure the deepest indent, and make the topping twice as thick.
- To spread overlay, you should use a gauge rake. These tools are like garden rakes, but they can adjust their depth to distribute the product to your desired thickness. You need to do this while it is still gelatinous enough to be spread. If your mix is setting too quickly, or drying, the materials tend to drag and make clumps as opposed to being adhesive to the surface. If the rake leaves tack marks, don’t worry! Those will be resolved later preparing to stamp the base.
- Trowel the surface with the use of a fresno or a steel hand trowel. Moving the blade slowly, in a continuous motion will combine the aggregate all while having a layer of paste rise to the surface. Typically, completion of one pass of your trowel over the surface will be sufficient. If you overwork your mix, “density blisters” may occur. These are mounds caused when moisture or air is caught under the surface layer. No need to worry, however, if your surface is not completely smooth, because you’ll be using the stamping tools to imprint it later. If your mixture seems too dense to spread, some manufacturers will recommend that you mist the surface with water to loosen things up for the finishing trowel. It is important to only use a light layer so you do not hinder the surface strength or impression quality later on.
- You need to cover your overlay surface and stamping mats with a release agent. Release agents may come in either liquid or dry form.
Powdered releasing agents are also available tinted, and sometimes called an antiquing release. If you use the tinted releasing agent, it is usually a contrasting color that will create a more weathered appearance, as the stamped overlay is usually integrally tinted as well. You may cast these powdered release agents by flicking it on the surface with a dry 8 inch brush, or by hand over the entire overlay. It is important to check the product’s instructions for proper coverage rate. The idea is to apply the mixture in a consistent, light layer. If you apply too much, the texture of your imprint could be obstructed.
Powdered release agents are great with breaking bonds between the surface mortar and the stamps, however, cleanup can be sloppy, even more so if you are handling a project indoors. In general, about ⅘ of your agent should be expunged after the overlay is stamped and allowed to cure. This is beneficial for achieving more subtle coloring and will provide more proper adhesion.
Stamped overlays are more commonly associated with liquid release agents. This is because any removal is typically unnecessary as most of the product evaporates and it implements great bond-breaking abilities. The downside, to some, is that it is clear. You may add color by mixing tinted powdered release with liquid release in ratios that suit your needs. It is advised that you allow the powdered release to rest at least one day before you install your overlay, this way the powder may dissolve completely. It is ideal to use a pump-type sprayer in order to apply an orderly layer just before you stamp. You should churn your sprayer often by shaking it gently so the pigment won’t fix onto the bottom and make dark splotches on your overlay.